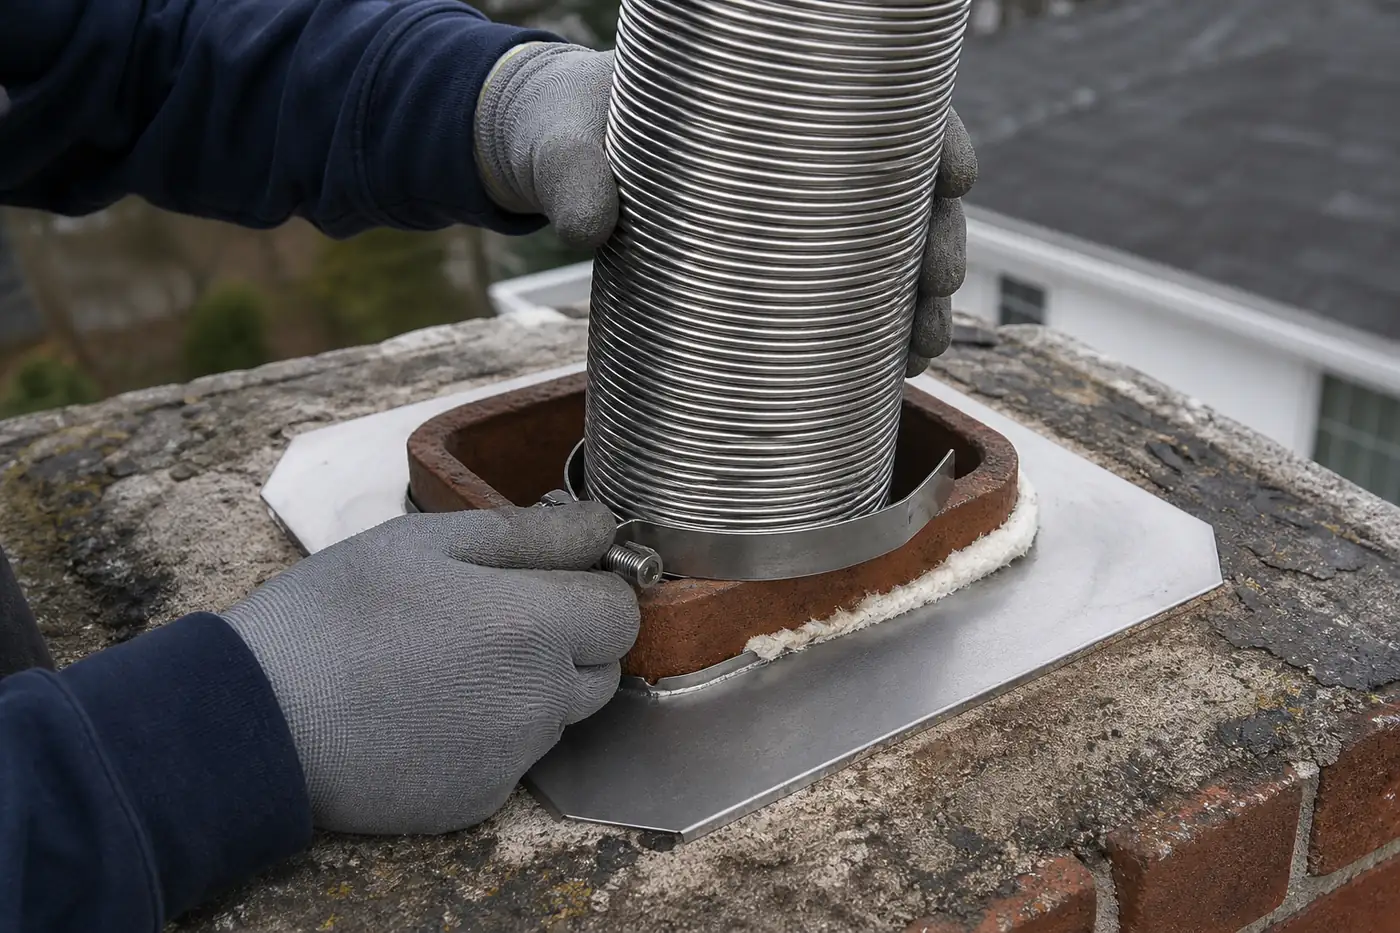
Yes, if a camera shows cracked or missing flue tiles, or if you are changing the appliance that vents into the chimney, and in Boston relining runs $1,200 to $4,500 depending on whether the liner is repaired or replaced. The liner is the passage that carries smoke and combustion gases out of your house, so it has to be intact and suited to what is connected to it. The $49 inspection is credited toward approved work, and the written price comes before anything starts.
- Chimney relining in Boston runs $1,200 to $2,500 for a liner repair and $1,500 to $4,500 for a replacement, with venting work from $2,000.
- The liner contains smoke and gases, so cracked tiles, missing joints or a liner that does not suit the appliance are real safety issues.
- The flue is looked at with a camera, and you see photos of what the technician finds before you decide.
- The $49 inspection is credited toward approved work, and the written price comes first.
What a chimney liner does and how it fails
The liner is the inner pipe or tile passage of your chimney. Its job is to carry smoke, gases and heat from the fireplace, stove or heating appliance up and out of the house, and to keep all of that away from the brick, the framing and the rooms around it. Without a sound liner, hot gases and sparks can reach wood framing, and combustion products can leak into living space.
Many older Boston homes, including brick houses, brownstones and rowhouses, have clay tile liners built in sections. Tile is durable, but it is brittle. Heat shock, moisture and freeze-thaw cycles crack it. The mortar between tiles can wash out, leaving gaps. Other chimneys carry metal liners that rust through, especially where they carry the moist exhaust of a modern high-efficiency appliance.
A damaged liner often does not show from the living room. A fire that looks normal can be pushing heat and gas through a crack that you will never see without a camera. That is why inspection of the flue is a standard part of this service, and why a visual look from below is not enough to rule a problem out.
Cold winters in Greater Boston add to the strain. A flue that heats up quickly when the fire starts and cools between uses goes through many cycles of expansion and contraction. Tile that was sound when the house was built can develop hairline cracks that open further over time. Moisture that gets into a flue from a failed cap or crown adds to the damage, which is one reason a liner problem is often found alongside a top-of-chimney problem.
Signs the liner may need work
These are the findings and clues that point toward relining:
- A camera inspection shows cracked, shifted or missing flue tiles.
- Mortar joints between tiles are missing, leaving gaps in the flue.
- A metal liner or vent shows rust, corrosion or small holes.
- You are changing the appliance, for example adding a gas insert, a stove or a new furnace or boiler, and the old flue was built for something else.
- Dark staining, dripping liquid or a sharp odor suggests the venting is not suited to what runs through it.
- There has been a documented chimney fire, and the flue may have been damaged by the heat.
None of these can be confirmed by looking at the outside of the chimney. Draft problems, smoke coming back into the room, or a carbon monoxide alarm that sounds are reasons to stop using the appliance and call for help right away. A carbon monoxide alarm is an emergency. Leave the house and call 911.
Some of these signs belong to a different problem, and that is fine. Staining can come from a leak, and smoke in the room can come from a blocked flue or a closed damper. The camera inspection sorts them out. You do not need to guess which sign is which before you call. Describe what you noticed, and the technician will work out what it points to.
What the technician checks before recommending a liner
A liner is chosen to fit the appliance and the chimney together. The inspection collects the facts needed to decide, and each one changes the answer.
Fuel and appliance
Wood, gas and oil appliances produce different exhaust and need different venting. The technician needs to know what burns, what the appliance is rated for, how the connector pipe attaches, and what the maker's venting instructions say. If you have the manual, bring it.
The flue itself
The flue is examined from accessible openings, usually with a camera, to find cracks, gaps, offsets and blockages. Photos of what is found are shown to you.
Size and shape
Height, flue dimensions and any bends are measured. These control which liner can physically be installed and whether the chimney can draft the way the appliance needs.
Can the existing passage accept a new system?
Some old flues are too narrow, too crooked or too damaged to take a liner without other work. The technician evaluates that now, so you hear it before pricing rather than in the middle of the job.
Top, bottom and insulation
The plan also covers how the liner will be insulated, how it ends at the top, and how it connects to the appliance at the bottom.
The inspection ends with a clear statement of what the flue can and cannot do. If the existing flue can be repaired and still suits the appliance, you hear that. If it cannot, you hear why, and you see the camera photos that support it. A recommendation to reline should never arrive without a picture of the reason.
Liner repair, replacement and venting for a new appliance
Not every liner problem means a full new liner. Which route fits depends on what the camera shows and what you plan to connect.
- Repair: limited damage in a liner that is otherwise sound. This path applies when a short section is cracked or the joints need attention and the rest of the flue is in good shape.
- Replacement: the liner is cracked or broken in many places, is missing too much material, or has corroded through. A new liner is installed through the full length of the flue.
- Venting for a new or changed appliance: a gas insert, stove, furnace or boiler often needs a liner sized and rated for that exact appliance. This is quoted separately from a repair of the old liner.
The price table later on this page shows the range for each. The point here is that these are three different jobs. A repair is not a cheaper version of a replacement, and venting for a new appliance is not simply a liner swap. You can see the full set of cost factors on the chimney relining cost page.
Do not assume the larger job is better. A limited repair on a liner that is otherwise sound can be the right answer, and spending more on a full replacement does not add safety when a short repair is enough. On the other hand, patching a flue that is failing throughout puts money into something that will need to be redone. The camera findings tell you which is which.
How a metal liner is installed
The most common modern fix for a damaged flue is a metal liner, sized for the appliance and run through the existing chimney. It gives a smooth, sealed passage, and it can be chosen to suit the fuel in use.
Sizing
A liner that is too small restricts draft. One that is too large can cool the exhaust too much, which leads to condensation and poor draft. Sizing is part of the plan and is based on the appliance and the chimney height, not on a guess.
Running the liner
The liner is lowered from the top or fed up from the bottom through the flue. Bends in the old flue are one reason the camera inspection comes first, since they affect what can pass through.
Insulation
Where the system calls for insulation, it is added around the liner so exhaust stays warm enough to rise and so heat from the liner is kept away from the masonry.
Termination and connection
The top of the liner is finished in a way that fits the system and keeps rain out. At the bottom, the liner is connected to the appliance, with the connection checked before the system is put into use.
Because every chimney is different, ask for the plan in writing. It should name the liner type, what is being insulated, how the top will be finished and how the appliance will be connected. Those details are what you compare against another company's quote.
Other lining options for tile and masonry flues
Metal is not the only route. When a flue has been evaluated as suitable, other methods can restore the passage without a full liner.
Listed vent sections can be replaced where they are damaged, for example a corroded section of a metal vent. A cast or repair system can be used to restore a damaged masonry flue in place, when the existing passage can accept it. These are chosen after the camera inspection, and not every flue qualifies.
Ask the technician why a method was chosen for your chimney. A clear answer ties the choice to what the camera found, the appliance, and the flue's shape. If a recommendation is not explained, ask for it in writing with photos. You are entitled to understand what is going into your chimney before you approve it.
Cost is not a reason to ignore a damaged liner. A flue with failed joints can allow gases and heat to escape into the walls, and the damage is not always visible until it becomes serious. If the price of full work is more than you can take on at once, say so. The technician can explain what is urgent and what can be planned for, and you can compare that with a second opinion. A second opinion is free when you bring a written report from a reputable local chimney company.
When damage is more than a liner problem
The flue sits inside the chimney, and trouble in one place often travels. A cracked liner can go with a damaged smoke chamber, with heavy creosote buildup, or with failing brick around the flue. The technician looks at those too, and tells you what belongs to the liner and what belongs to another repair.
Heavy buildup in the flue is a separate job, covered on the creosote removal page. The sloped area just above the damper, where the flue narrows, is the smoke chamber, and its repair is explained on the smoke chamber repair page. Keeping these jobs clear helps you compare quotes honestly, since a liner price should not hide unrelated work.
After a chimney fire, the flue should be checked before use, even if the fire seemed small. If a fire is happening now, leave the house and call 911. Do not try to put it out yourself.
Appliances and chimneys have to be matched in practice, not just on paper. The connector pipe, the height of the flue above the appliance, and the way the exhaust enters the liner all affect how well things draft. If the old connection was improvised, the technician will point it out and quote any correction separately. You are not left with a new liner feeding an old problem.
Changing your appliance and what the liner has to match
Many liner jobs begin with a plan to change something in the house. A new gas insert, a wood stove, a replacement boiler or furnace, or a switch from one fuel to another can all change what the flue has to handle. An old clay-tile flue built for an open wood fire may not suit a high-efficiency gas appliance, because that exhaust is cooler and can condense inside an unsuitable flue.
Before you buy a new appliance, have the flue looked at. It is cheaper to learn the venting needs first than to find out after the appliance is on site. Bring the appliance model and the maker's instructions to the inspection.
Gas line work, including connecting or adjusting the gas supply, belongs to your gas utility or a licensed gas fitter. The chimney technician handles the venting side. If you smell gas at any point, leave the house and call the gas utility or 911. Check with your insurer and your local building department about any approvals your project may need.
After the work, ask for photos of the finished liner top and the appliance connection. These are useful for your records, and they are useful if you later sell the house or file an insurance claim. Keep them with the written scope.
What the visit and the install day are like
You book through the contact page or by phone and get a 3-hour arrival window, with a call ahead. Your first appointment is the $49 inspection, where the flue is examined with a camera, the findings are photographed, and the technician talks through the options for your appliance.
After that you receive a written price. The $49 is credited toward approved work. Nothing is installed until you agree to the scope and price in writing.
On install day, the technician follows the approved plan. Expect some noise and activity at the roof and the hearth, and expect the fireplace area to be covered. The length of the job depends on the flue, the access and the system chosen, and the technician will say what to expect when giving the price instead of promising a timeline in advance. When the work is finished, the connection is checked and you see photos of the result.
If you are buying or selling a house with a fireplace, a flue problem noted in a home inspection report is a common reason for relining. A written inspection of the chimney, with photos, gives both sides a clear starting point for the conversation.
How to prepare and when relining is urgent
Clear the space around the fireplace or appliance, move furniture and rugs away, and remove items from the mantel. Have the appliance manual or model number ready. Keep pets and children out of the work area, and leave the roof to the technician.
Stop using the fireplace or appliance, and book soon, if a camera has shown cracks or gaps in the flue, if smoke is coming into the room, or if there has been a chimney fire. A damaged liner can let heat and gas reach places they should not. If a carbon monoxide alarm sounds, leave the house and call 911.
If you are only planning a new appliance, there is time to do this properly, but have the flue checked before the purchase. If you are not sure whether the liner is the problem, a regular chimney sweep visit includes a look at the flue as part of the cleaning with inspection.
Relining price in Boston and how to book
| Work | Boston price |
|---|---|
| Liner repair | $1,200 to $2,500 |
| Liner replacement | $1,500 to $4,500 |
| Venting for a new or changed appliance | From $2,000 |
| General inspection | $49, credited toward approved work |
The spread comes from the length and condition of the flue, the type of liner, and what the appliance needs. Anything outside this list, such as other masonry or smoke chamber work found along the way, is quoted in writing after the $49 inspection. The chimney relining cost page explains what moves a job up or down. To schedule the flue inspection, use the contact page or call (617) 404-9587.
Questions homeowners ask
How do I know if my flue liner is cracked?
You usually cannot tell from the room. A camera passed through the flue shows cracked or shifted tiles and missing mortar joints. Signs that suggest it is worth checking include smoke leaking into the room, staining or odor, and a past chimney fire.
Do I need a new liner if I am installing a gas insert or stove?
Often yes. A flue built for an open wood fire may not suit a different appliance, and some exhaust can condense in an unsuitable flue. The appliance maker's instructions and a camera inspection decide it for your chimney.
What is the difference between a liner repair and a replacement?
A repair fixes limited damage in a liner that is otherwise sound. A replacement installs a new liner through the full length of the flue when the damage is widespread or the old liner has failed.
Is it safe to use my fireplace with cracked tiles?
A cracked liner can let heat and gases reach the framing and living space, so we recommend stopping use until the flue has been checked. If you have a carbon monoxide alarm sounding or a fire, leave the house and call 911.
Can the same visit install the gas connection too?
The chimney work covers the venting and liner. Gas line work belongs to the gas utility or a licensed gas fitter, so it is arranged separately. Ask about coordinating the two so the work happens in the right order.
What if the camera finds the flue is too damaged for a liner?
The technician will tell you and explain the options, which may include other masonry work first. You see the photos and the written scope before you approve anything, and the $49 inspection is credited toward approved work.
Related guidance
Start with the Boston cost guide, then read the guides below.
- Antique Home Chimneys in Concord and Lexington
- Chimney Sweep vs Inspection: Which Do You Need? Boston
- Fireplace Insert vs Open Fireplace for Boston Homes
- Chimney Liner Types Compared: Clay, Steel, Cast
- Chimney Relining Cost in Boston (2026 Prices)